

~ first attempt using cotton strips ~
crochet some chair pads and a rag rug!Some time ago, at a flea market, I bought a couple of full thirty gallon bags of fabric end rolls of various colors, patterns, sizes and fabrics. Both bags cost $2 so I gave my quilting bee buddies first choice pick. After they chose what they wanted, I was still left with one full thirty gallon bag and half of the second bag was full as well. I've been using some of the strips to weave rag rugs but decided I'd like to crochet some chair pads and a rag rug. Several decades ago, the Mother of Appalachian Feet crocheted a rag rug and I've always remember it for its simple, hand crafted, home made beauty. Then, a while back, at an auction a pink and white circular rag rug sold for $150 but I didn't get it because...my brain wasn't working, that must be it! It was a bargain and was somewhere between five and six feet in diameter. Can you just imagine the love that went into each and every stitch?!

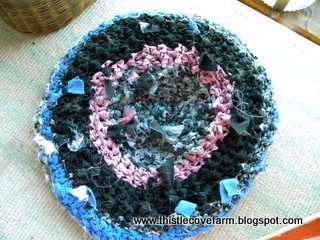
~ back side of first chair pad ~
So, since I've been on the mend last week, and will continue to stay low and close to home this week, I decided it's a jolly good time to crochet some chair pads. I've known people to use plastic shopping bags, a la wally world or grocery store, and they work well, especially on a porch where they are, at least, partially protected. Others will purchase sheets, tablecloths, tee shirts or other clothing at thrift stores, cut them into strips and crochet into pads, rugs, etc but I used fabric end rolls. Tools:
~ size J metal crochet hook
~ scissors
~ rags cut into one-half inch to one inch strips. If the fabric is cotton, I tend to cut closer to one-half inch strips but if the fabric is nylon or poly, the strips are cut closer to one inch.
It's easy enough to see I'm self taught at crochet and virtually everything I do is a variation of the chain stitch. For those of you who do know how to crochet, Leslie, you're thinking, "well, duh!" -smile- When I taught myself to knit, more than two decades ago, the language seemed familiar and, even though I'm not a great knitter, I took to it like a duck to water. When I tried to teach myself how to crochet, the language was more difficult and didn't make sense so I've used what I know and have had a modicum of success. Like I said, for those of you who truly know how to crochet, you'll, possibly, be appalled at my stitches. Yet, it works for me or perhaps I've learned how to tamper down those pesky first child perfection tendencies.
There are a gazillion places in the i-universe that give beautifully detailed crochet directions. Lion Brand is one of my favorite places as well as love their yarns; one day, I'd love to visit their NYC store.
The first photo shows my first attempt and it's rather pitiful. The fabrics are cottons, cut into about one inch strips and way too, physically, demanding for my hands and, possibly, for the crochet hook I used. I started out by chain stitching five stitches and then hooking the first stitch into the last stitch on the needle and making a circle. That was the start of my circular chair pad where things started off badly and got worse rather quickly.
Perhaps you can see the rather poochy middle; it reminds me of a Turkish squash only not as pretty. Although when you're sitting on the chair pad, it doesn't feel poochy and still provides some warmth and comfort from sitting upon a bare seat. I think I should have done a double crochet stitch but, in fact, did a half double or some forlorn variation thereof. The result was a "crown" type affair that will, assuredly, wear down after some use. Yep, you're reading me right...I'm not ripping it out and re-doing it.
About every four to six stitches, I'd hook an extra chain stitch to give the circular size some room to grow and this seemed to work well. Something else I did differently from other folks is, I'd start by crocheting into the front of the stitch but the second stitch I'd go into the back of the stitch. This seemed to keep the edges from rolling, or curling, up and into themselves. Every other stitch would be either the front OR the back...does that make sense?
On the back side, you can see the joined ends were not woven or crocheted in as I worked up the chair pad. Big mistake. Big, messy mistake. Big, messy mistake that took a lot more time to fix than it would have taken to do right the first time mistake and still looked like a train wreck when finished mistake. Or well, live and learn, eh?

~ second chair pad, front ~
~ second chair pad, back ~
The second attempt was a, trifle, more successful than the first. At least, the strips were cut into one-half inch strips and much, much easier to crochet. The pad started with five chain stitches, joined to make a circle and then I started with double crochet stitches which made a huge difference in both ease of crochet and in the way the pad lays flat with no "crown" in the center. Unfortunately, you can see I haven't quite learned about weaving in my ends and the back is a hodgepodge of raw ends sticking up. There is a method of connecting the strips wherein two ends are placed together and a slice is cut into the middle but about one inch from the top. The same thing, written differently, is found here. Other people, using the sewing machine, sew the ends together but I make a knot and tug it tightly to join two strips of fabric. This works especially well with the nylon and polyester fabrics and my concerns about the two ends coming "un-done" or ripping out are nullified.

~ beginning crochet rag rug, front ~

~ crochet rag rug, back ~
This is the beginning of the crochet rag rug and it looks much, much better than the pitiful chair pads. I've learned to weave in my raw, joined edges and this gives the rug a much more finished look as you can see in the second photo. The woven pieces are added along the edge of the row as opposed to left sticking up and being woven in later. The gray material strip, top photo and top right of the photo, is where I'm getting ready to either add some more gray stripes or another color.
Another thing I did differently is for one round, I believe pink, I did an extra chain stitch on each and every stitch and this gave some room to grow or, at the very least, room to lie flat. These fabrics are a combination of cotton knits -green, pink, gray tee shirt type material- and nylon -beige middle- and I'm getting ready to add another row of nylon in a yellow color. Thus far, I've not added any patterns and am not sure I will add patterns. I'm rather liking the solid tones of color and was really amazed at how the gray made the pink POP! The gray is a lot prettier in the rug than on the roll. I've still got white and yellow but not sure if they are cotton knits or nylons and also not sure if there are other colors; I still have to dig deep in the trash bags.
You've heard of quilting bees of old and there was good reason. Many women, working together, could finish many quilts in a weekend or week.
Barn looms were huge and it would take two women to dress the loom and it would take them a day, even longer, depending upon how much thread they had.
From ancient times, women have gathered to share their work, share their stories, share their food and it's true...many hands do make light work. It's also easier to learn, visually, when one has a guide and, perhaps more importantly, it's easier to learn from someone else's mistakes. I've found this to be true with my little adventure with crocheting rag chair pads and rug. I would have saved time, effort, energy and materials had I had someone to show me how to do the initial stitches, weave in ends, etc. But that's okay. My real point is to encourage you to t-r-y something new and don't let your fear of not getting it right stop you from t-r-y-i-n-g. At the very least, try.
There are those who wouldn't have shown the roughly made two first chair pads. There are those who would rip both out and start over. Life is a learning process and I'm finding I'm enjoying the journey more when I'm not so focused on the perfection or rightness of the product. When I'm focused on learning, the enJOYment of the process gives my life richness and grace and that, in turn, makes me grateful.
Blessings ~ learning ~ letting go of fear ~ adventure in small, and large, doses ~ chair pads ~ time for the journey ~ rag rugs ~ sharing even though it's not perfect ~
Thanks for visiting Thistle Cove Farm,
Sandra

Thank you for sharing your adventure. I started making a rag rug a couple of years ago. Now, you have inspired me to get it out again. I crochet yarn rugs, but they have a tendency to turn out lop sided (tighter on the end I start on and looser on the other side). One of these days I will figure that one out.
ReplyDeletei wish you were here with me to show me how to do this....i LOVE it...i did manage to seed stitch a blanket for Teddy though....
ReplyDeleteit's almost time to get him.
kary
xxx
Glad you are on the mend and have something fun to occupy your time! Fabric is flexible, they will flatten out beautifully in no time.
ReplyDeleteWell, you know how I've struggled with the language of knitting! I figure if you get what you want you're doing it just fine. Lovely work!
ReplyDeleteEek! I wish I could just follow your instructions and get to it, but I need to actually see it done, and even then I get easily discouraged! I'm just thanking my lucky stars that I figured out how to crochet a necklace. My SIL was really tested in patience when she taught me how to do it. Your work is beautiful!
ReplyDeleteMany years ago, I crocheted rag rugs. To make the increase, just evenly space apart 2 stitches in one stitch. Isnt it fun to use this fabric up knowing you would probably never have sewn it up. This mats will last forever. Actually I think the more you wash them, the better they lay. And get softer. Enjoy the fruit of your labor!
ReplyDeleteI have just enjoyed both this and your previous post Sandra. You are so right about just trying something new,often we surprise ourselves, don't we? Maybe one day I will actually learn to crochet. I want to, but there are so many projects already crying out to be finished!
ReplyDeleteI hope you mend quickly, you have a lot to do now that Spring has sprung!
Hello neighbor. Love meeting new neighbors. I just came in for a quick minute and took a quick look at your blog. Plan on coming back when I have more time. Wanted to say a quick hello, and thank you for commenting on my blog. Come back and visit again soon, I plan on doing th same.
ReplyDeleteThanks so much for your comment on my blog today, & also for becoming a follower - it's great to 'meet' you, & I look forward to exploring your blog, too !
ReplyDeleteLynda, Kilimanjaro, East Africa
Thanks so much for your comment on my blog today, & also for becoming a follower - it's great to 'meet' you, & I look forward to exploring your blog, too !
ReplyDeleteLynda, Kilimanjaro, East Africa